nlp-contextual-meaning
NLP tool for indirect speech acts understanding in human robot-interaction. Abductive inferential approach based on contextual data.
View the Project on GitHub Davidelanz/nlp-contextual-meaning
![]()
IEEE IROS 2020 presentation
online
until November 25th, 2020:
![]()
Website: davidelanz.github.io/nlp-contextual-meaning
Documentation: nlp-contextual-meaning.rtfd.io
Paper: Abductive Recognition of Context-dependent Utterances in Human-robot Interaction
Context-dependent meaning recognition in natural language utterances is one of the fundamental problems of computational pragmatics. Abductive reasoning seems apt for modeling and understanding these phenomena. In fact, it presents observations through hypotheses, allowing us to understand subtexts and implied meanings without exact deductions.
Inspired by linguistics and philosophy of language studies, we explored abductive reasoning and context modeling in human-robot interaction.
Here, we present the code we used to carry the case study, analyzing whether such a system could manage correctly these linguistic phenomena.
References:
-
Lanza, Menicatti, Sgorbissa. “Abductive Recognition of Context-dependent Utterances in Human-robot Interaction’’, in 2020 IEEE/RSJ International Conference on Intelligent Robots and Systems (IROS), Las Vegas, USA.
-
Lanza. “Context-dependent meanings recognition in human-robot interaction’’, Bachelor’s Thesis, University of Genoa, 2018 (in italian) [pdf]
Contents
Getting started
Setting up DialogFlow
Follow the guide at https://cloud.google.com/dialogflow/docs/quick/setup in order to set up the connection between the Python client and DialogFlow. Briefly:
-
Start creating a new DialogFlow agent and the related Google project:

Now, you should have an empty agent with the only
Defaultintent: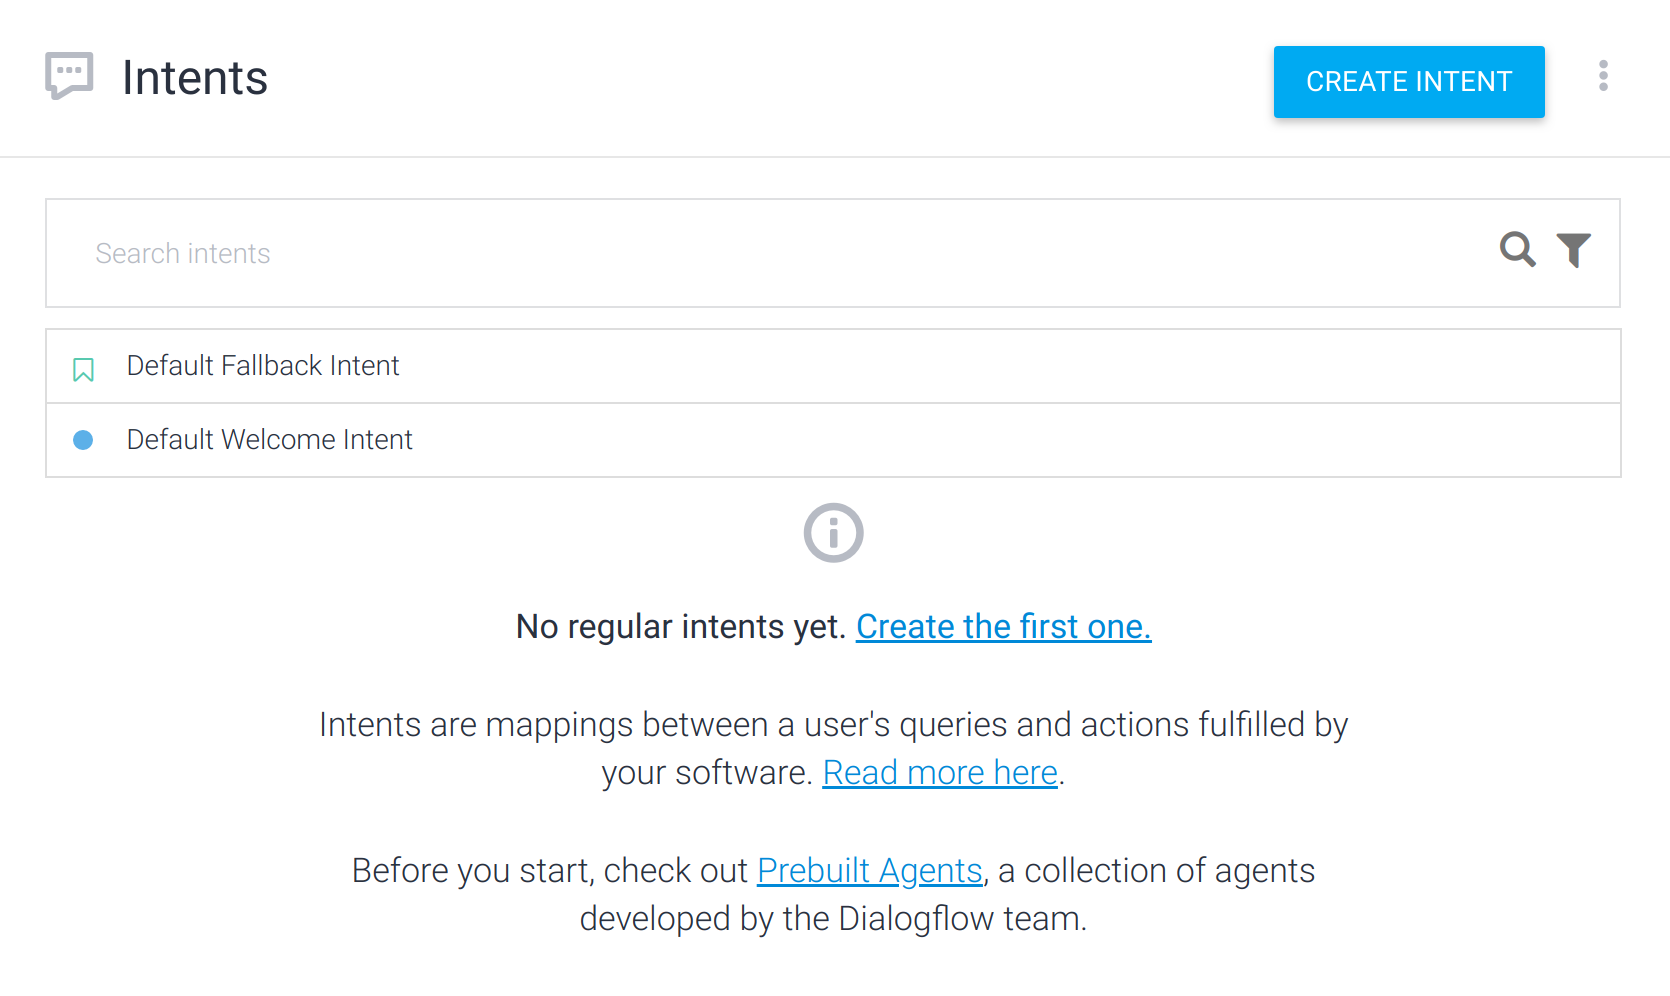
-
Go to tour Google Cloud Platform console. You should find the related project:

-
Following the instructions in https://cloud.google.com/dialogflow/docs/quick/setup, create a Service Account fitting the Dialogflow Agent and download the JSON key.
IMPORTANT: the Service Account has to be a “DialogFlow API Admin” one, not a “DialogFlow API Client” or others. Admin rights are needed for Botium validation
-
The JSON key shoud be saved in the root folder of this project (the same as this README and the
client.pyfile) and calledclient_key.json. It shoud present the following fields:{ "type": "service_account", "project_id": , "private_key_id": , "private_key": , "client_email": , "client_id": , "auth_uri": , "token_uri": , "auth_provider_x509_cert_url": , "client_x509_cert_url": } -
Install and configure then your Google Cloud SDK (see https://cloud.google.com/sdk/docs).
The settings.json file
The settings.json file containts information about the CSVdataset file name,
the folder in which export the intents in JSON format (from the CSV dataset)
and the language code of the agent (e.g. "it","en-US" etc…).
For the use case already available in this repository, we have:
{
  "dataset-file": "situations_it",
  "intents-folder": "dataset_json",
  "language": "it"
}
Prepare the dataset
A dataset of Italian sentences linked to 21 situations (85 sentences for
each situations) is available at situations_dataset_.csv. In
order to train the DialogFlow agent, you have to:
-
Convert the CSV data into JSON data by running:
python dataset/csv_to_json.py -
Upload the 21
.jsonfiles created to DialogFlow:

- At the end, you should have a situation like the one here in the picture:

Run a demo
To simply test the agent you can run the agent.py file as follows:
python agent.py -s "Ho davvero caldo"
The result would be something like
"Ho davvero caldo" -> Intent: avere-caldo (score: 0.8965118527412415).
This means the DialogFlow agent identified the intent avere-caldo
from the sentence “Ho davvero caldo” with a confidence of almost 90%.
Test the client
To run and test the client:
python client.py
Some interaction examples (log are available in the client-generated
logs folder after running the client):
-----------------------------------------------
\INPUT > ho caldo
Robot: Vuoi che apra la finestra? (Y/N) y
Robot: apro la finestra
-----------------------------------------------
\INPUT > ho caldo
Robot: Vuoi che apra la finestra? (Y/N) n
Robot: porto una bottiglia d'acqua
-----------------------------------------------
\INPUT > mi sto annoiando a morte
Robot: accendo la televisione
-----------------------------------------------
Change the language
Recall that the language of the dataset and hence the context table generated are in Italian, but the system can be easily adapted to other languages given a dataset as follows:
| INTENT NAME             | PARENT'S INTENT | IS PARENT |            | [LANGUAGE]            |
| ----------------------- | --------------- | --------- | ---------- | --------------------- |
| Default Fallback Intent |                 |           | answer     | [DEFAULT_ANSWER]      |
| [INTENT_1]              |                 |           | user-input | [TRAINING_SENTENCE_1] |
| [INTENT_1]              |                 |           | user-input | [TRAINING_SENTENCE_2] |
| ...                     |                 |           | ...        | ...                   |
| [INTENT_1]              |                 |           | user-input | [TRAINING_SENTENCE_N] |
| [INTENT_2]              |                 |           | user-input | [TRAINING_SENTENCE_1] |
| ...                     |                 |           | ...        | ...                   |
The dataset has to be stored in .csv format with ; separator. For example:
INTENT NAME;PARENT'S INTENT;IS PARENT?;;en-US
Default Fallback Intent;;answer;I haven't understood.
;;;;
overheat;;;user-input;so hot!
overheat;;;user-input;I'm dying of heat.
overheat;;;user-input;it's so hot!
overheat;;;user-input;it's too hot in this room.
overheat;;;user-input;How hot
;;;;
bug-in-room;;;user-input;Ew, a bug!
bug-in-room;;;user-input;Oh, God, there's a bug.
bug-in-room;;;user-input;Oh, my God, there's a bug!
bug-in-room;;;user-input;Dad, there's a huge bug in the room.
bug-in-room;;;user-input;How disgusting, a winged beast.
;;;;
boredom;;;user-input;Aren't you bored?
boredom;;;user-input;Bollocks, I'm bored.
boredom;;;user-input;This is so boring!
boredom;;;user-input;I'm so bored.
boredom;;;user-input;Let's do something, I'm dying of boredom.
;;;;
Then, the context_table.json file has to be changed as well. For example,
if we keep the same reactions as the one provided here, for the
example dataset we just saw we could have:
{
  "reactions": [
    "I'll open the window",
    "I'll bring you a bottle of water",
    "I'll turn on the TV"
  ],
  "queries": [
    "Should I open the window?",
    "Should I bring you a bottle of water?",
    "Should I turn on the TV?"
  ],
  "default": ["I am sorry, I can't do a lot for you."],
  "r1": {
    "overheat": 0.1,
    "bug-in-room": 0.07,
    "boredom": 0
  },
  "r2": {
    "overheat": 0.02,
    "bug-in-room": 0.02,
    "boredom": 0
  },
  "r3": {
    "overheat": 0,
    "bug-in-room": 0,
    "boredom": 0.07
  }
}
Use Botium for identification accuracy
To use Botium’s nlp validation methods, we need a dedicated agent, for example:

Then, as for the client, we need to create a Service Account fitting the newly created Dialogflow Agent and download the JSON key.
The JSON key shoud be saved in the root folder of this project
(the same as this README and the client.py file) and
called kfold_key.json.
Setting up Botium
Requirements:
- Node.js (
sudo apt-get install nodejs) - NPM (
sudo apt-get install npm)
We will need Botium CLI:
! To install node package globally use
sudo npm install -g PACKAGE. If you runbotium-clias a normal shell command, it fails if you don’t install the package (and thus the executable) globally. To avoid this and install it locally anyway, run it from the.binfoldernode_modules/.bin/botium-cli [COMMAND]
npm install botium-cli
npm install botium-connector-dialogflow
node_modules/.bin/botium-cli init
It is possible replace the latest release of the connector with the latest changes from the Github repository:
npm install codeforequity-at/botium-connector-dialogflow#master
Then, create a file botium.json in the working directory and add the
Google credentials for accessing your Dialogflow agent.
This article
shows how to retrieve all those settings
(you can find them in the client_key.json and kfold_key.json files).
{
  "botium": {
    "Capabilities": {
      "PROJECTNAME": "<whatever>",
      "CONTAINERMODE": "dialogflow",
      "DIALOGFLOW_PROJECT_ID": "<google CLIENT project id>",
      "DIALOGFLOW_CLIENT_EMAIL": "<service CLIENT credentials email>",
      "DIALOGFLOW_PRIVATE_KEY": "<service CLIENT credentials private key>",
      "DIALOGFLOW_NLP_PROJECT_ID": "<google KFOLD VALIDATION project id>",
      "DIALOGFLOW_NLP_CLIENT_EMAIL": "<service KFOLD VALIDATION credentials email>",
      "DIALOGFLOW_NLP_PRIVATE_KEY": "<service KFOLD VALIDATION credentials private key>",
      "RATELIMIT_USERSAYS_MINTIME": "<milliseconds between API requests>",
      "RATELIMIT_USERSAYS_MAXCONCURRENT": 1
    }
  }
}
If you have a Stadard Plan in DialogFlow, you have a limited number of queries per minute.
RATELIMIT_USERSAYS_MINTIMEallows you to put a bottleneck on testing in order to not exceed you quota (see this page for further info and this issue).Here, we suggest
"RATELIMIT_USERSAYS_MINTIME": 10000
To check the configuration, run the emulator (Botium CLI required) to bring up a chat interface in your terminal window:
node_modules/.bin/botium-cli emulator
Now that botium setup is ready, it’s time to run the benchmark. The
botium-cli nlpanalytics command runs NLP analytics with
on of these two algorithms:
validate- run one-shot training and testing of NLP enginek-fold- run k-fold training and testing of NLP engine
See this article for further information.
Prepare the dataset
We can extract the data - intents and utterances (user examples) - from our already-trained DialogFlow automatically:
export GOOGLE_APPLICATION_CREDENTIALS=client_key.json
mkdir dataset_botium
node_modules/.bin/botium-cli nlpextract --config botium.json --convos dataset_botium --verbose
This command will write several text files to the dataset_botium directory
with filename pattern intentname.utterances.txt
(see Botium Wiki).
First line of the file contains the intent name, following lines are the
utterances (user examples). For example:
temperature
Is it me or it is hot here?
What's the current temperature?
What’s the current temperature?
Validate dataset
To validate the dataset with wich we trained our DialogFlow agent, we run the stratified k-fold cross-validation for the data against the DialogFlow agent (with k=5, meaning one fifth is used for testing, four fifth are used for training):
export GOOGLE_APPLICATION_CREDENTIALS=kfold_key.json
node_modules/.bin/botium-cli nlpanalytics k-fold -k 5 --config botium.json --convos dataset_botium
Botium will create a separate DialogFlow agent workspace for all test runs and clean it up afterwards. The original workspace - if existing - won’t be affected.
:warning: A problem occured with Botium CLI validation. An issue has been opened at https://github.com/codeforequity-at/botium-core/issues/565 . In here, we report the wrong validation results, waiting for a fix in the validation process.
The benchmark takes some time, and the results are printed out when ready - for each of the 5 rounds and the total average over all rounds:
############# Summary #############
K-Fold Round 1: Precision=0.5833 Recall=0.0990 F1-Score=0.1692 Tech.OK=286 Tech.Failures=47
K-Fold Round 2: Precision=0.7278 Recall=0.1181 F1-Score=0.2032 Tech.OK=331 Tech.Failures=0
K-Fold Round 3: Precision=0.8234 Recall=0.1348 F1-Score=0.2317 Tech.OK=327 Tech.Failures=0
K-Fold Round 4: Precision=0.7633 Recall=0.1504 F1-Score=0.2513 Tech.OK=285 Tech.Failures=37
K-Fold Round 5: Precision=0.6250 Recall=0.1279 F1-Score=0.2124 Tech.OK=277 Tech.Failures=38
K-Fold Avg: Precision=0.7046 Recall=0.1260 F1-Score=0.2138
Wrote output file k-fold.csv
Wrote predictions output file k-fold-predictions.csv
Note that Botium supports other platforms. It is possible then to compare the accuracies of these platform given a certain dataset.
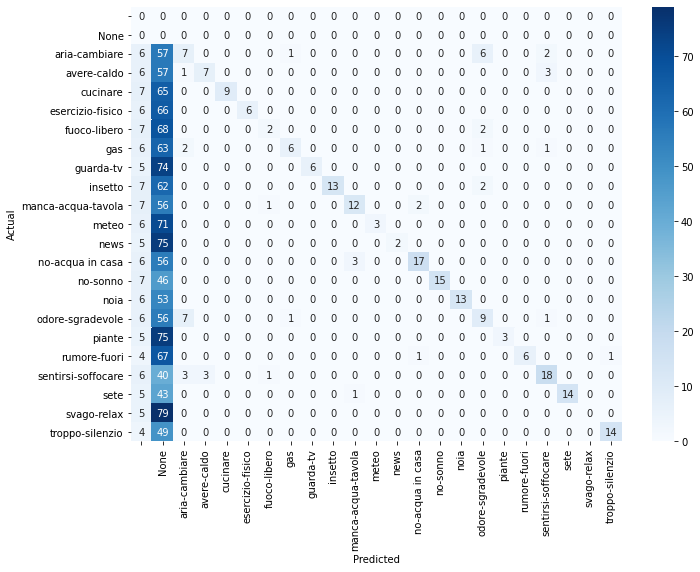
With the Jupyter notebook k-fold-confusion-matrix.ipynb it is possible
to plot the confusion matrix from the predictions output file
k-fold-predictions.csv generated by Botium: